
Modules

What is a Module?

Modules are the building blocks of Sensory Percussion, so it's important to understand how they work in order to build your own sounds. This section will go over the different parts of a module, but to better understand the overall modular structure of the software, check out the software concepts section.

There are two kinds of modules used to build sounds in Sensory Percussion: Controllers and Generators

Controllers

Controller modules don't produce sound themselves; they just affect the relationship between other modules. There are six kinds of controllers, each of which performs a different action on all of the modules inside of it. Controllers can hold any other kind of module, whether it's a generator or another controller.

Generators

Generators, as you might guess from the name, generate sound. The most commonly found type of generator in our preset kits is the sampler. Unlike controllers, generators can't hold other modules, so they're always at the end of the modular chain.

Below is an example layer from the set Acedia. You can see how the leftmost controller (drum pads controller) contains another controller (note controller), which contains a generator (sampler). Since generators can't hold other modules, this sampler is the end of the chain:

A screenshot of a layer with a Drum Pads controller, A Note controller, and a sampler visible A screenshot of a layer with a Drum Pads controller, A Note controller, and a sampler visible

Both controllers and generators can be found in the Build section of the library. You might also notice that this section includes Effects. Effects are not generators because they don't produce sound on their own, but they're also not controllers because they can't hold other modules. They're kindof in their own special category, which allows them to be placed on any module at any point in the chain. For more info on effects, check out the Effects page.

Panels

Modules are made up of panels. These are smaller sections that provide different settings and functionality to each module. There are some panels that are common to all modules, for example the mix, macros, and velocity i/o panels.

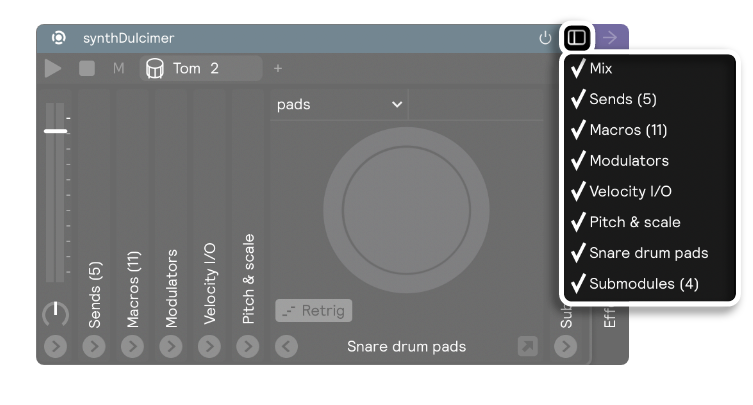
You can show or hide various panels by clicking on the panel button on the top-right of the module.

A screenshot displaying the panels dropdown of a Drum Pad controller

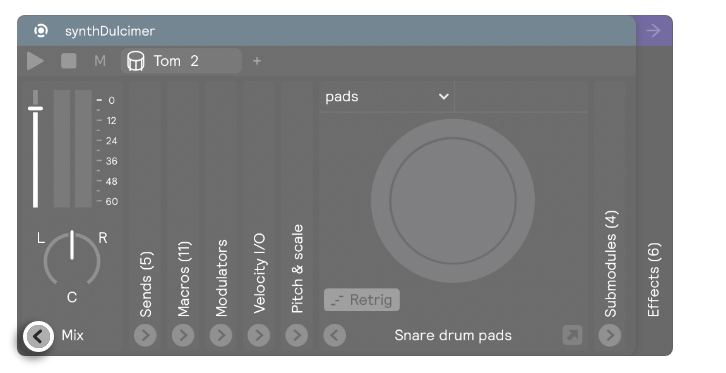
Each panel can also be expanded or collapsed by clicking on the "open/close" arrow button on the bottom-left of the panel.

A screenshot of a Drum Pad controller with most of its panels collapsed

Mix

This panel allows you to quickly adjust the volume and panning of the entire layer, meaning if you have multiple modules inside of this layer, they will all be affected. Some modules also have their own mix panels, so you can adjust them individually as well.

A screenshot of a controller with its mix panel highlighted.

Sends

A screenshot of a controller with its sends panel highlighted.

Sends allow you to control how much of the audio from a selected module (and its submodules) is sent to an audio bus. Sends are a quick way to apply the same effect to multiple layers across your set. Creating a new send by clicking the '+' button will automatically create a corresponding audio bus layer.

Macros

The Macros panel lets you add knobs, buttons, or sliders that can be assigned to almost any parameter further down the layer. To add a Macro, click the plus button in the Macros panel and feel free to name it.

A screenshot of a controller with its macros panel highlighted.

There are four types of macros you can create: Knobs, Sliders, Toggles, and Triggers. A new Macro defaults to a knob, but you can easily change it by right-clicking the macro and choosing a new type from the macro type menu.

A screenshot of a macro panel which has examples of the various macro types.

A screenshot of a macro knob.

Knobs are the default Macro type and are used for controlling continuous parameters.

Connecting Macros to parameters

There are two ways to connect a Macro:

  1. After creating the Macro, you can simply drag and drop it onto the parameter you want to connect it to. If the drag target it a bit far away, you can achieve the same effect by right-clicking the Macro and finding your target under the assign menu.

  2. You can connect the Macro from your target. Simply right-click the parameter you want to control and find your Macro under the assign -> macros menu.

Modulators

This is where you can add any combination of six different modulators, or modes of controlling parameters within Sensory Percussion with your playing. The six different kinds of modulators are: Velocity, Timbre, Speed, MIDI Control, Envelope, and LFO. For an explanation of how each of these works, check out the Assignments/Modulators page.

A screenshot of the modulators panel with a velocity modulator shown.

Velocity Input/Output

A screenshot of the Velocity I/O panel

Here is where you can where you can adjust how the entire layer responds to your playing.

A screenshot of a linear velocity I/O panel setting

Want everything loud on pretty much every hit? Then drag the middle node up and to the left:

A screenshot of a loud velocity I/O panel setting.

Want this layer to completely ignore all of the quiet hits? Then drag the left-low node up and to the right:

A screenshot of a velocity I/O setting to ignore quiet hits.

A velocity I/O panel exists on every Module and Controller, so it often would be overkill to use it all the way up here at the layer-level, but sometimes you do want the entire layer to respond in a certain way -- you do you.

Pitch & Scale

A screenshot of the Pitch & Scale panel

The Pitch & Scale panel is a powerful tool that allows you to control melody to your samplers and modules.

When the scale mode panel is closed, you can see the parameters: Transpose, Quantize,Tune, Relative/Absolute, root, voice cntrl and the Output meter.

The Transpose knob allows you to change the pitch of the entire module and all of its submodules. When Quantize is on, the Transpose knob will snap to the nearest halfstep or semitone (keeping to the chromatic scale). The Tune knob allows you to change the pitch in Cents, which are 1/100th of a semitone. This is useful for fine-tuning the pitch of a module or achieving non-western tunings with quartertones.

When in Relative mode, the Output meter will display the output of the module in steps + cents, and maintain note messages sent from Note Controllers or MIDI input.

When in Absolute mode, the root parameter is engaged and set to C3 automatically (this can be changed to reflect the actual notes of the audio files inside the samplers) . When in Absolute mode, the Output will now display the actual note being output by this module.

voice cntrl allows you to set the behavior of the tails of a repitched sampler. If set to “Next,” then no voices slide, if set to “All,” then all voices slide. This parameter is only relevant if you have an assignment on Transpose, Tune, or Note Control (more on Note Control below).

A screenshot of the Pitch & Scale panel with the scale panel open

When you open up the scale mode, a keyboard appears where you can select and deselect notes. You can also select a scale from the Scale Mode dropdown. The notes/scale selected really only come into play if you have an assignment or modulator mapped to Note Control.

The assignment or modulator you’ve mapped to Note Control will govern the melody of the module. For example, if you select the Hungarian Minor scale from the Scale Mode dropdown, and then map velocity to Note Control: your range of quiet to loud hits will trigger C, D, Eb, F#, G, Ab, B, C (assuming your samples are tuned to C and you have not altered the 8ve range).

You can set the top and bottom range of the scale’s quantization by adjusting the sliders to the left and right of 8ve range, by default they are set to 0 and 12, which means there is a one octave range selected by default.

Submodules

This is where you will see a list of all of the modules contained inside of the module you have selected. This panel is exclusive to controller modules, since generator modules can't hold other modules.

A screenshot of a controller with the submodules panel highlighted.

Effects

The Effects panel works slightly differently from other panels. The FX panel has a dedicated button (The FX button to open the Effects panel of a module)to show/hide it rather than pinning/unpinning. This panel is where you will find all of your effects modules. To add an effect, simply drag an effect from the Effects library on the left and drop it anywhere on the layer, and it will automatically be added to the effects panel of the layer. Effects can be added to generators, controllers, or audio buses. For more information on how effects work, check out the How to Add Effects page.

A screenshot of a controller with the effects panel highlighted.