Mix View


Mix view is another view of your set that allows you to focus solely on mixing. Unlike Play/Edit view, this view doesn't allow you to access Macros or Virtual Inputs. While you can create/delete layers in this view, the main purpose is to have fine control over the volume and panning of each layer, as well as the overall set mix.
You can access Set Effects at the bottom of the mix view window. Click the arrow next to the set effects to expand the Set Effects. This panel works just like the fx panel of a module, except these effects are applied to every sound in the entire set. By default, presets from the Sunhouse library come with some mastering effects in this panel.
Submixes
Another feature that is exclusive to Mix view is submixes. Submixes allow you to create different combinations of the layers in your set, which can then be routed to different hardware outputs. With submixes, you can send separate stems of each instrument group out to a DAW, or you can create a separate headphone vs. PA mix for live performance.
Submixes and the Global Set Mixes
All mixes in the session (both the main mix and any submixes) all flow through the mixes in the global set. This means that you can use the global set to control the overall volume of all sets in the session , and you can use the global set's effects to apply effects to the entire session. This is useful for applying effects to all sets, such as reverb or delay, or for controlling the overall volume of the session.
How To Use Submixes
By default, Mix view will show you the main mix, which includes all of the layers in your set. This mix always exists, and deleting a layer from the main mix will delete it in Edit/Play view as well. So it's best to add/delete layers in your submixes rather than in the main mix. To create a submix, first click on the Add Submix button under one of the Mix Outs (1-16):
 Once you do this, a new submix will be created, which is empty by default. None of the layers of your set are in a newly-created submix; they can instead be found under the
 Inactive Layers panel on the left:
To move a layer from the inactive layers into your submix, simply click the + button next to the layer's name. It will then appear in the main submix, and it will be sent out of the Mix Out channel (1-16) where you created it.
Submixes and the layers within them both have right-click options that can help speed up your workflow. Right-clicking a submix gives you the option to copy the entire submix to a new mix out channel. Right-clicking an inactive layer gives you the option to add it to any submix you've created, or to all of them at once. And right-clicking an active layer gives you the option to add or remove it from all submixes, or reveal that layer in Edit view.
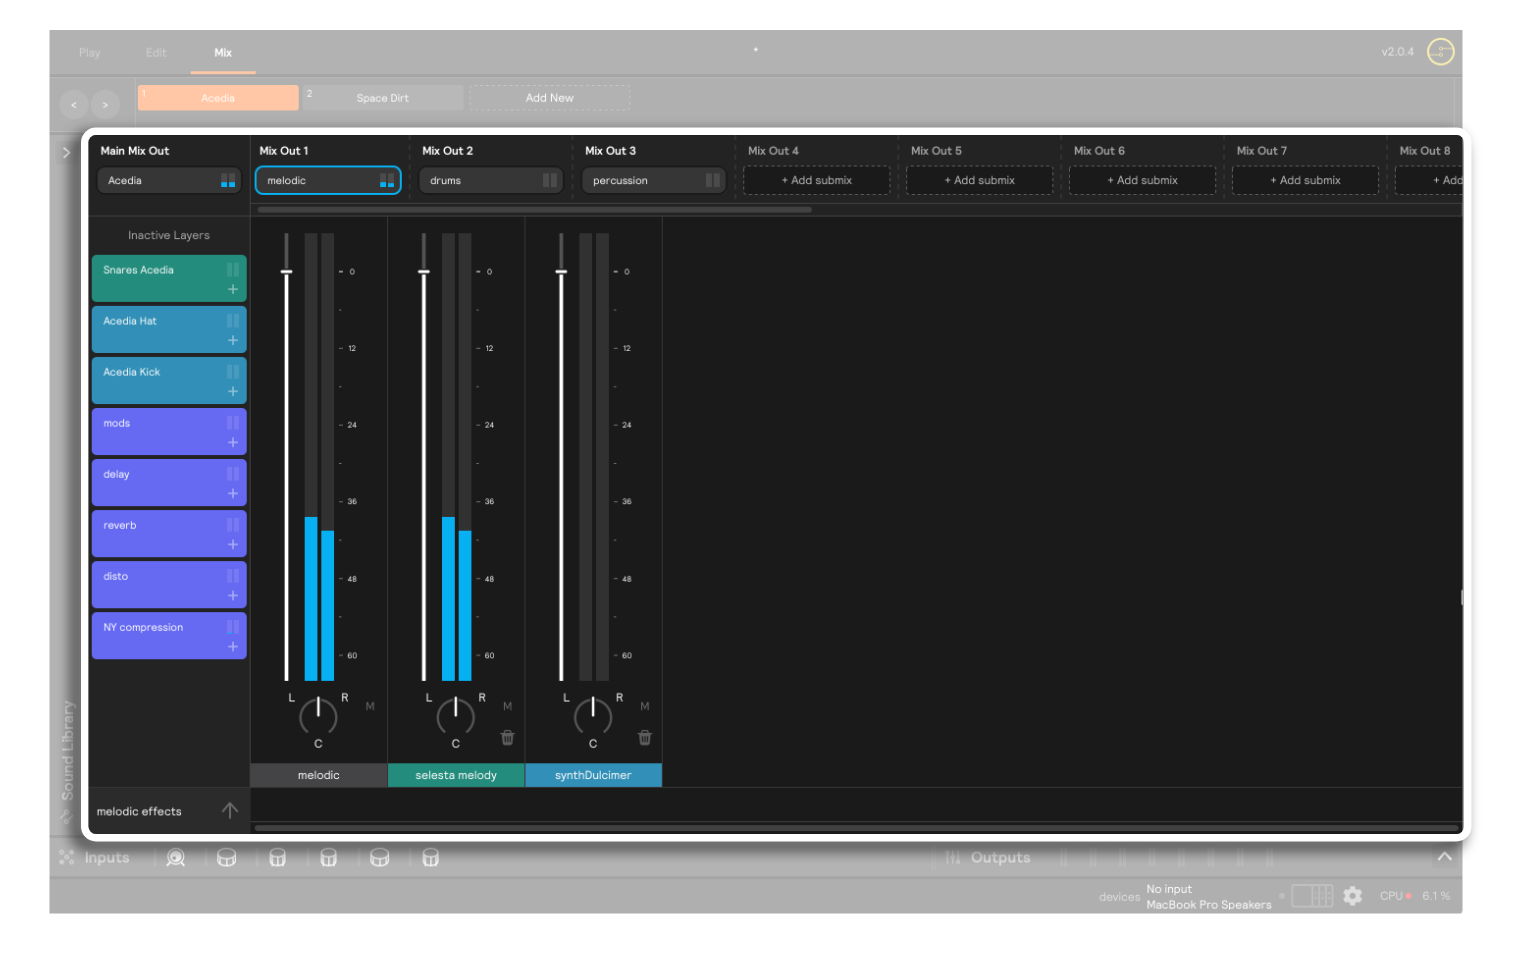
Above is an example of a melodic submix of the set Acedia. It includes the layers "selesta melody" and "synthDulcimer," which are the only two layers of the set that include melodic sounds. It's being sent out of Mix Out 1, while Drum sounds are being sent out of Mix Out 2 and Percussive sounds are being sent out of Mix Out 3.
Now, you have three different types of sounds being sent out of three separate channels. The last step is to choose which 3 hardware outputs you want to send these 3 submixes out of. This can be done in the Source dropdown on your hardware outputs:
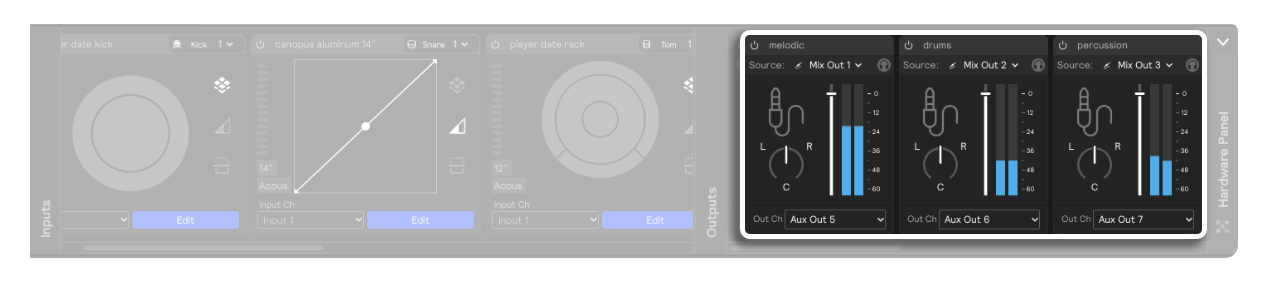
Now, you have 3 submixes (Mix Outs 1, 2, and 3) routed to 3 hardware outputs (Aux 5, 6, and 7). This means you can record each instrument group as its own track by creating 3 audio tracks in your DAW and setting their inputs to Aux 5, 6, and 7!