Setting up Your gear


Drum Sensors
Applying the pickup element
Before you attach the sensor to a drum, you need to apply the pickup elements. The pickup element is what the sensor is sensing, so it’s important to take the time to get this part right. Don’t worry, you won’t have to do this often. Only when you want to use Sensory Percussion on new drums or after changing drum heads.

You can place the pickup element anywhere you would like on the drumhead, but it must be between two lugs - and, if you are applying the pickup element to the snare drum, make sure you avoid the snare strainer or other levers that might block the sensor.
You can always "practice place" the sensor before placing the pickup element -- that is, attach the sensor before placing the pickup element, just to make sure it's in a good place on your drum (and not blocked) -- then you can remove the sensor and follow the steps below to place the pickup element.
Peel the paper strip off of the pickup element, revealing the adhesive beneath.
Line the legs of the disposable positioner up with the rim on your drum and drop it down so that the pickup element adheres to the head.
Apply pressure to the pickup element with your thumb for a few seconds before lifting and snapping off the disposable positioner.
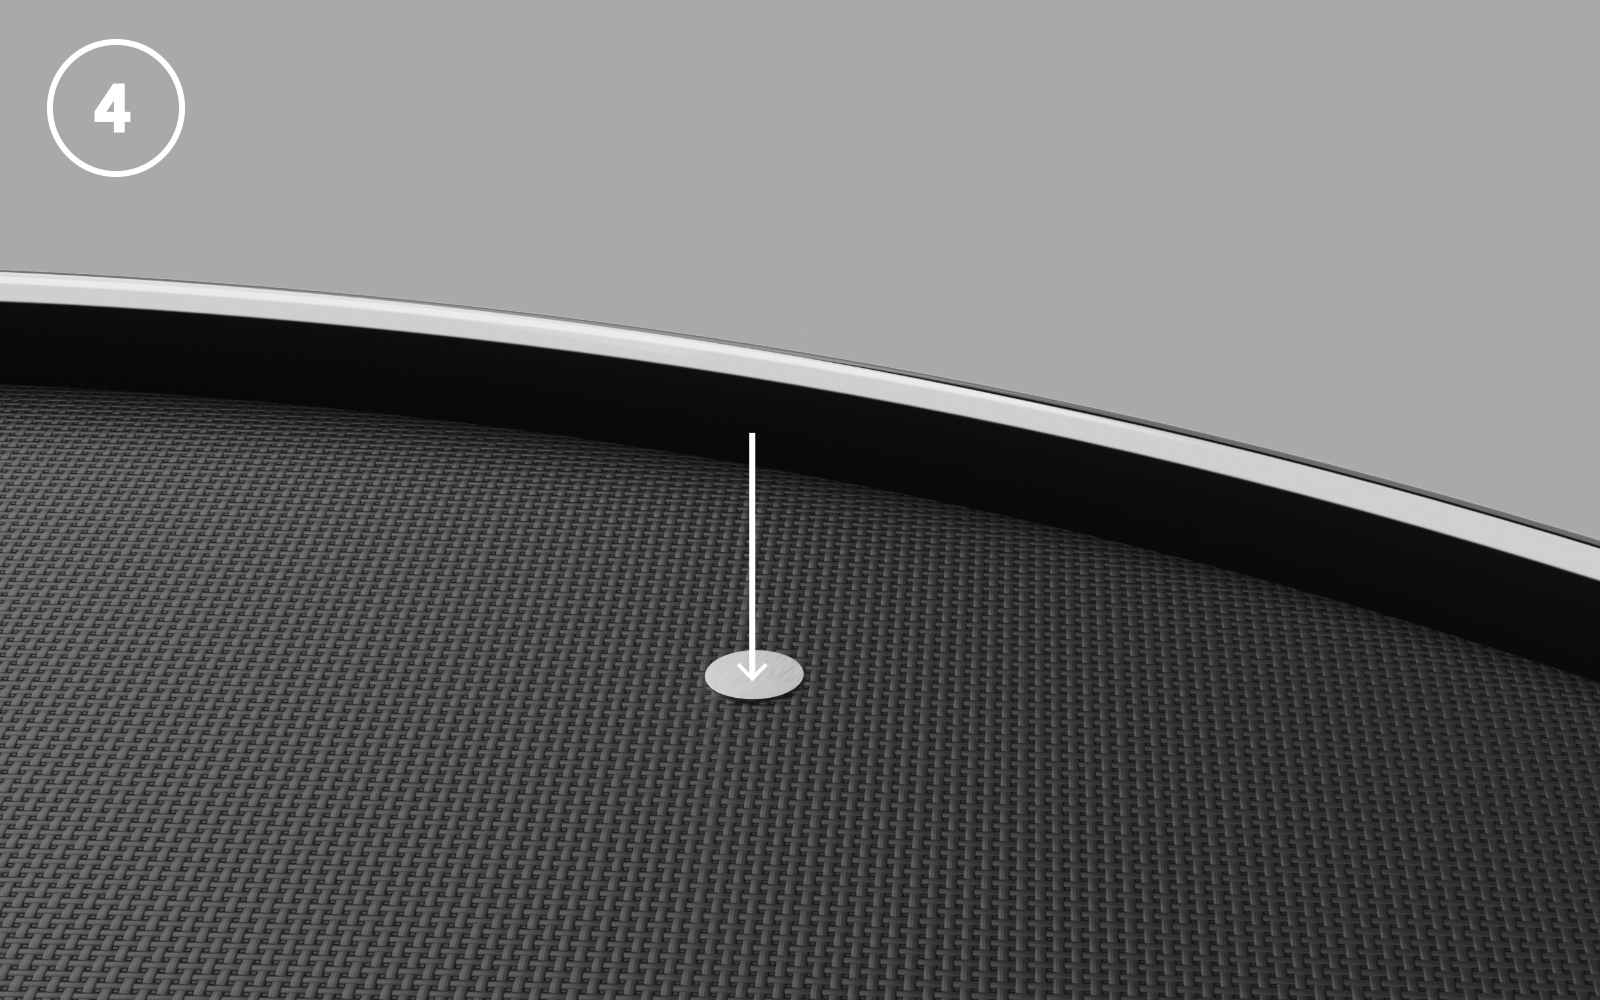
Keep your finger on the pickup element, applying pressure for about ten seconds. It takes about 24-hours for the adhesive to fully cure, but it's generally fine to start playing right away.
Avoid reusing pickup elements. They're hard to clean once they've been used and generally don't stay on the drum as well the second time. They are cheap and disposable, so just use a new one.
Attaching the sensor to your drum
Attaching the sensor correctly is important in order to get the clearest signal from your drum into Sensory Percussion.
Twist the sensor thumbscrew counter-clockwise to open it enough to fit over the rim of your drum.
Firmly attach the sensor so that the head is directly over the pickup element. The LED indicator light should shine behind the pickup element (not on top of it).
Plug TRS Cable into the top of the sensor. Secure the cable by pressing it into the clip on the side.
The drum sensor fits both snares/toms with a variety of rim types as well kick drums with standard hoops. Here are some tips for attaching your sensors:
- Make sure the sensor is parallel to the head of the drum. If the sensor is leaning up or down, it will affect the quality of the signal you'll capture of your playing.
- On some kick drums with wide hoops, you might need to completely open the sensor by unscrewing it until the clamp disconnects. This will let you pull back the clamp to fit around the hoop.
Cymbal Sensors


-
Remove any wingnuts or felts from the top of your cymbal stand. The metal threads of the stand should be fully exposed.
-
Thread the full EVANS Hybrid Cymbal stack onto the stand and tighten until it's secure.
The indicator light on the cymbal sensor module should face towards. The unit can adjusted by lifting it off the base, rotating it, and then reseating it.
-
Remove the Cymbal Quck Lock by pressing the top with your thumb and pulling up.
-
Then remove the top Flex Felt.
-
Place your cymbal on top of the Flex Felt Cradle, then place the top flex felt on top of the cymbal.
-
Reinstall the Cymbal Quick Lock by holding it between you fingers like a syringe and pressing the top with your thumb. Push it down and release the top botton to lock it in place.
-
Tighten the assembly by rotating the nut at the bottom of the Quick Lock. Be careful lot to overtighten.
Hi-hat Sensors


-
Remove existing hi-hat clutch from the top of your hi-hat stand.
-
Hold the entire EVANS Hybrid Hi-hat assembly upside down and remove the quick lock by pressing the top with your thumb and pulling up.
-
Remove the smaller flex felt from the top of the assembly.
-
Place the top hi-hat cymbal on the flex felt cradle, then place the smaller flex felt on top of the cymbal.
-
Reinstall the hi-hat quick lock by holding it between your fingers like a syringe and pressing the top with your thumb. Push it down and release the top button to lock it in place.
-
Tighten it by rotating the nut at the bottom of the quick lock.
-
Install the entire Hi-hat sensor clutch onto the hi-hat stand's rod. Rotate it so that the indicator light faces the drum throne.
-
Tighten the clutch to your designed height.
-
Attach the gooseneck cable arm to the hi-hat stand with the included clamp, psotiiongin it away from your playing direction.
-
Connect the TRS cable to the hi-hat sensor and clip it to the end of the hi-hat arm leaving enough slack to prevent tension.
Connecting everything together
-
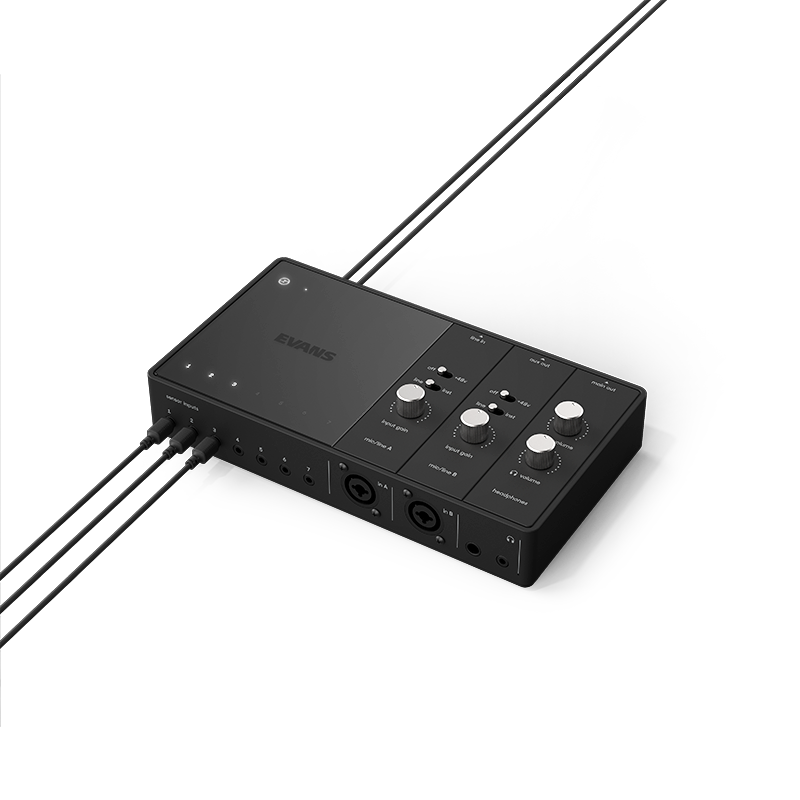
After you attach the sensors to your drums, cymbals, and hi-hat, plug the 3.5mm cables into the sensors. Then plug those into the Sensor Inputs on the EVANS Portal interface.
-
You'll want to connect speakers or headphones to the Portal as well -- you can use the Headphones plugs in the front or the Main output plugs on the back for that.
-
Next, connect the Portal to your computer with the USB-C cable and connect the power plug.
-
Turn it on and open the software!