Compressor
The Compressor narrows the dynamic range of a signal by turning down anything that rises above a threshold, so the loud hits come closer to the quiet ones and the whole part sits more evenly in the mix. It's quick and easy to use — just add the effect, turn up the ratio and pull down the threshold to get the effect pumping.
It can also be driven by a signal other than its own input: the classic ducking setup where a pad gets pushed down every time the kick lands.
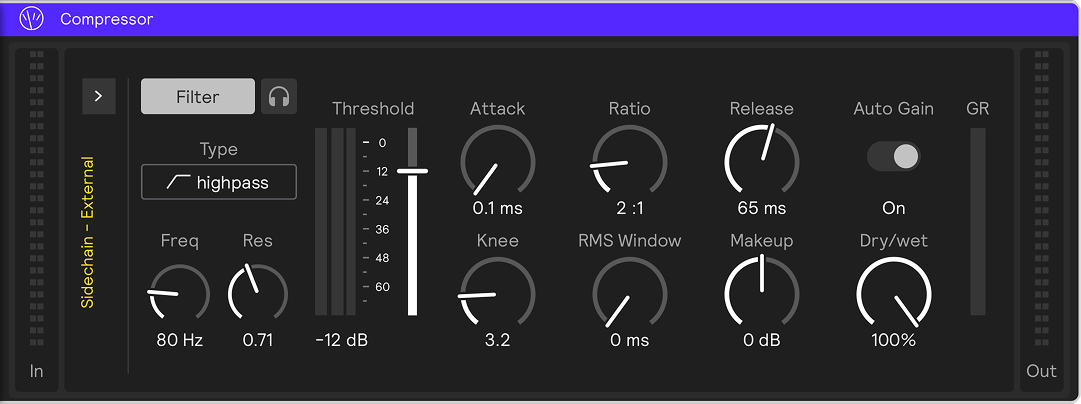
Parameters
Threshold
The level above which the compressor starts turning the signal down, from −72 to +6 dB. Peaks above it get squashed; anything below passes untouched.
Ratio
How hard the signal over the threshold is squashed, from 1:1 to 62:1. At 1:1 nothing happens; low ratios shape gently, and high ratios approach limiting.
Knee
How abruptly compression comes in around the threshold, up to 18 dB. At 0 the knee is hard and the compressor snaps on; higher values ease it in over a wider band for a softer response.
Attack
How quickly gain reduction is applied once the signal crosses the threshold, from 0.1 to 150 ms. A fast attack clamps transients; a slow attack lets the initial hit through before clamping.
Release
How quickly gain reduction backs off after the signal falls below the threshold, from 10 to 290 ms. A fast release breathes and pumps; a slow release rides more smoothly.
Auto Gain
Automatically makes up the level the compressor took away, so heavier compression doesn't just mean a quieter part. On by default.
Makeup
A manual output gain trim, from −32 to +32 dB, for boosting or cutting on top of what the compressor did.
RMS Window
The averaging time of the level detector, up to 100 ms. At 0 the detector follows peaks for a snappy response; higher values smooth it out for a steadier, less twitchy one.
Dry / Wet
Sets the balance between the uncompressed and compressed signal. Backing off from 100% gives you parallel compression, where the original transients stay alongside the squashed version.
Small dots in the corner of the Attack and Release boxes light up while that stage of the envelope is actively shaping gain reduction, so you can dial the timing in by eye as well as by ear.
Sidechain
Switch on External in the sidechain panel to drive the compressor with a signal other than its own input. The panel provides the input and tap selectors along with the key gain and mix knobs, and is the same panel used by the Gate.
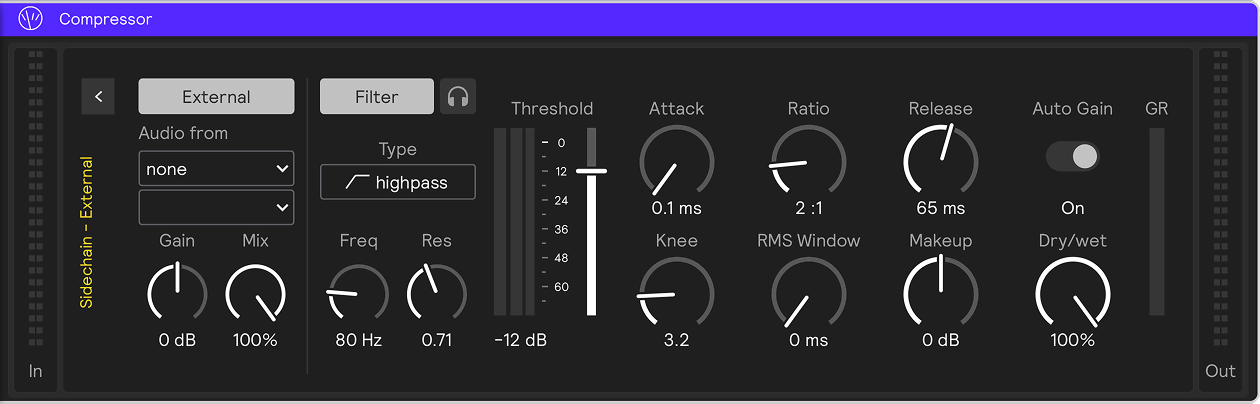
The tap selector chooses where the sidechain is taken from the source module: before its effects, after its effects, or after its mixer fader.
Auto Gain is meaningless when an external signal drives the detector, since the compressor has no way to know how much it took off that signal, so it's dropped for as long as a sidechain source is connected.
Detector filter
A Filter (on by default, highpass at 80 Hz) and a headphone Listen button sit to the right of the sidechain panel and stay visible whether or not the panel is folded.
While sidechain is off, the filter keys on the compressor's own input, so you can have the detector respond to specific frequencies — ignoring sub-bass, say — without routing an external source. Turning sidechain on always drops that internal filtering: the compressor then keys off whatever's connected, filtered the same way once you choose a source, but hears nothing at all until you do.
Listen auditions whatever is driving the detector at any point along that chain.
Reading the meters
The wide meter to the left of the threshold slider shows the raw signal feeding the detector, and turns yellow when an external sidechain is driving it. The skinny bar beside it shows the detector level after the RMS window — that's the value actually compared against the threshold. The GR strip on the right shows how much gain reduction is being applied right now.