Controllers Panel
Controllers serve a powerful function in Sensory Percussion. They let you manipulate sounds and effects simply by playing the drums. There are five main types of controllers that you can assign to parameters in Sensory Percussion: Timbre - how you play the drums affects the way the controllers move, Velocity - how hard you play drives the controllers, also Speed - how fast you play affects the controllers.
The fourth kind of controller is Envelope, which lets you send a shape (time and amplitude based) to any parameter.
And the fifth kind of controller is External/Automated, which contains MIDI Input, Keyboard Input, and LFOs (Low Frequency Oscillators).
Adding a controller
To add a controller to a knob or effect in Sensory Percussion, first click on the controller tab and select the track number of the drum that will be driving the controller. Next click the “+” button in the right of the panel and select the type of controller. Dial in the parameters of that controller (more on that later), and then drag the ![]() icon to the Sensory Percussion knob, slider, button or number box that you want to control. Almost everything in Sensory Percussion is controllable!
icon to the Sensory Percussion knob, slider, button or number box that you want to control. Almost everything in Sensory Percussion is controllable!
Controllers work across drum tracks. That means you could assign snare controller to a parameter on a tom track.
Kit vs. Set Level Controllers
Controllers can operate on the kit level or the set level. Controllers displaying a left facing, greyed out, pin button are on the kit level, meaning that they disapear when you change to a new kit. Click the pin to make a controller that operates on the set level. Now, no longer greyed out, and facing downward the controller is now pinned to the set, so its assignments will remain even after you change kits (as long as they are assigned to parameters that persist through kit changes - i.e.: volume sliders and pan knobs, and buttons on the mixer, as well as the kit selector).
Don’t forget, Sensory Percussion controllers can be mapped to MIDI and control other audio software or even hardware! See Midi Panel for how to MIDI map controllers.
Controller Types
Timbre
In order to make a controller respond to the zones of the drums, add a Timbre controller in the controllers panel. In the collapsible panel that appears, select a timbral start and end point.
Timbre controllers are a little bit like blends in that they are activated by the timbral changes of the different zones on a drum. Using timbre controllers like Center-to Edge or Rim-Tip-to-Rim-Shoulder is often a greatly effective musical gesture, but definitely try less intuitive combinations! Maybe the missing element of your kit is a Cross Stick-to-Damped-edge controller - you’ll never know until you try!
Velocity
Velocity controllers react to how hard you play the drums. They can be set up to be activated by all the pads of a drum, but can also be activated by a single pad.
One of the many cool things you can do with a velocity controller is to assign it to the amount of reverb on a drum - the harder the hit, the more reverberant the sound.
Speed
A speed controller reacts to how fast you play the drum or pad that it is driven by.
Kit
Timbre controllers only respond to the timbre of one drum, but sometimes you may want velocity and speed controllers to respond to the entire kit. If velocity or speed assignments are governed by controllers under the kit tab, then Sensory Percussion reacts to how loud or how fast you are playing the entire kit and drives the assignments accordingly.
Button Controllers
You can not only drag controller assignments onto parameters with continuous control values like knobs, number boxes, and sliders, but also onto button parameters with two states, like solo, mute and kit switching.
Once a controller has been assigned to a button, it automatically assumes button control mode, you can toggle back to continuous control by clicking on the ![]() icon, but keep in mind that a continuous controller will turn the button on and off with every change in gesture.
icon, but keep in mind that a continuous controller will turn the button on and off with every change in gesture.
In button control mode, you will notice that there is a drop down menu that displays momentary or toggle and a slider labeled pivot. The pivot point is the value at which the button changes states. For example, let's say you have a center-to-edge button controller from drum 1 assigned to the mute button on send 1 and the pivot parameter is in it's default, center position. The mute button will activate when your playing crosses the timbral zone between center and edge. Move the pivot parameter to the right, and you will have to play closer to the edge to activate the mute button, to the left and you will have to play closer to the center.
A momentary button controller will change states every time your playing crosses back and forth over the pivot point, whereas a toggle button controller changes state each time the pivot point is crossed at its highest value. In the center-to-edge controller example above, if the button controller is in momentary mode, then the mute button will switch on when you play the edge of the drum and off when you play the center of the drum, but if the button controller is in toggle mode, then it will switch on and off each time you play the edge and retain its current position when you play the center.
Envelope Controllers
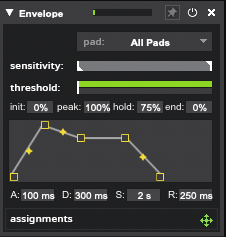
Envelope controllers trigger an ADSR (attack, decay, sustain, release) shape to whatever software parameter they are assigned to. Because envelopes are triggered by a keyboard press and hold action in traditional synths, there are a few more features for envelopes in Sensory Percussion (since drumming is much different from pressing and holding down a key to activate a sustain). Namely those features are: init, peak, hold, end, and they are percent levels governing each point in the ADSR.
Envelope controllers are activated by the full drum channel by default, but can be activated by any trained gesture:
Attack (A): Amount of time (ms/s) that it takes the shape to hit its highest value.
Decay (D): Amount of time (ms/s) that it takes the shape to settle into to its sustained value.
Sustain (S): Amount of time (ms/s) that the shape maintains its value before it begins the release.
Release (R): Amount of time (ms/s) that the shape descends/ascends to its final value.
Init: The point (0% to 100%) on the assigned parameter where the shape begins its attack.
Peak: The highest point (0% to 100%) of the attack.
Hold: The level (0% to 100%) of the sustain.
End: The final level (0% to 100%) of the shape.
Additionally, their are points between each of the attack, decay, sustain, release in the visual interface of the envelope controller that allow you to add rounder curves to the shape you create.
MIDI Input
In order to use an external device to send MIDI signals to Sensory Percussion, you first must activate that device by checking its box next to "Active MIDI Inputs" in the I/O panel.
Now click on Ext.Auto under the controllers tab and select "MIDI Input" from the drop down menu. You can assign a parameter of that controller to a button, knob, slider, or slot in Sensory Percussion's Mixer or Kit Switcher by inputting the MIDI parameter's note value, or by clicking "learn" and manipulating the physical parameter on the controller, then dragging Sensory Percussion's assignment to its destination.
A MIDI device is often best used for any action that would typically require you to touch your mouse. Switching kits is a particularly useful case for employing an external MIDI controller.
LFOs
Controllers driven by LFOs are available by clicking the Ext.Auto tab next to the controller track numbers.
There are six different LFO shape to choose from: sine, triangle, square, saw down, saw up, and random, you can set their speed by adjusting the rate.